Sunday, February 25, 2007

Beam me down, Scotty

As the digital landscape changes, the line seems to be blurring between still and video camera. With that, Apple has added the ability to import your stills as well as the videos you take with your digital still camera straight into iPhoto.

Unfortunately, some of us who have not upgraded to a newer version of iPhoto are left wondering how do we get my movies on my digital still camera to my computer. You could use the application that the camera manufacturer gave you when you bought the camera, but most mac users either don't install it because they have iPhoto or the app provided with the camera sucks. Fear not, Apple has given us all another method. Let's get to work:


1. Plug in and turn on you camera. For most people, iPhoto will launch, but quit it as we don't need it.

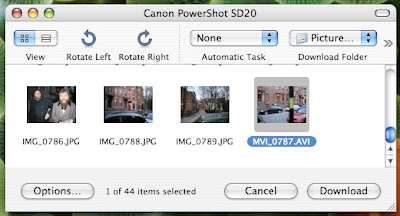
2. Open an app named "Image Capture". This can be found in your applications folder.

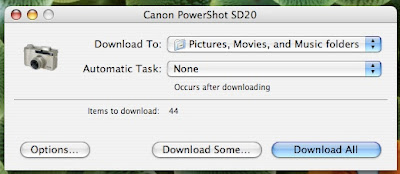
3. By default, Image Capture will download photos to your Photos folder and videos to your Video folder. I suggest leaving it set to the default unless you want the file in a specific spot.

4. Once that is set, click "Download Some".

5. A new window will appear that has all photos and videos on your camera. For here there are two methods to get your file to your computer. If you want one specific file and do not need to save in a particular spot, you can just drag it to your desktop and call it a day. If this isn't want you want, then you need option #2 and read on.

6. Unfortunately, Apple has not followed all of its user interface rules in this app. You can select multiple files in a series by holding down shift, but you cannot select multiple files not in a series by holding down ⌘. Anyway, select your series of videos/photos or just the one file you want and click download.

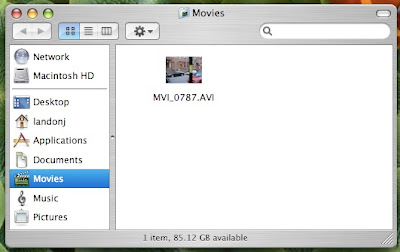
7. The folder to which the files that were downloaded will then appear in the finder.


That's it. For most of you newer Apple people, this issue doesn't concern you as the newest form of iPhoto downloads both photos and videos with ease. For others, this is a simple trick to get those few videos off your camera!

Friday, February 23, 2007

Mac 101 - install/uninstall that App!

OK, so sometimes I forget that the switchers out there are used to doing things the windows way. I am so used to doing things the mac way the I forget to explain even the basics. so here is a new segment, Mac 101!


How to Install & uninstall applications on the Mac.

Install: Copy application to any spot on your computer.
Uninstall: Drag application to trash and empty trash.

So, now that is out of the way, here is a meat of this post:

On the PC, you would always run an installer. It would add files with odd file extensions, like.dll, all across your hard drive. So when you went to uninstall the app, there was this huge mess that only an uninstaller could ever clean up and fully remove the app from the system.

Well, the mac works differently (shocking, I know!). There are really two methods to install an app on a computer. I realize that some of you are asking, "but I thought mac's were simplier? Why are there two ways on the mac and one way on the pc?". The easy answer is that there are two types of installs, those that alter the inner workings of you computer (be cautious with these,but don't fear, they are rare) and those that are just single file applications (these are much more common). For those complicated installs, they act just like the installs on the pc and you switchers are going to feel right as rain here. Yea, nothing new to learn!

The other types are much more simple. If you download something like Firefox, you will notice that all that exists is just the Firefox application. If you compare the same app on a pc there is the application and tons of files. Where are all these files on the mac? The app that you copy to the applications folder is actually a folder. Apple has just designed it so that all those important files are hidden away from the user and kept nice and clean by turning it into a folder, but it just looks like the icon of the app in question. Don't belive me, try this:

Right click, or hold down on the ctrl key while clicking, on any app in the Finder.

In the menu, select "Show Package Contents".

A new folder will pop up. These are all the "hidden" files that you never have to see or deal with.

So now that you know this, the way that you install on a Mac is just by copying the single file to your computer. You can copy it anywhere and it still should work. Now to uninstall, it is just as simple, like anything else on the computer that you dont want, throw it away (key command: select the item, and hit ⌘ + delete moves it to the trash, then shift + ⌘ + delete empties the trash). That is it. Not too crazy huh?

Oh and if you want to "install" the app in the dock? Welcome to the drag & drop world of Mac. Just click and drag the app to the doc and pick a spot for it. There you have it...

Sunday, February 18, 2007

My 1st Request! - Connect to a Network drive

Jen wants to know how to connect her Mac to a Network Drive. So, the easiest way to do this is just to browse to the Network within the Finder.

I never do this. Why? Because if you work at a large firm with many servers, then you will have to sort thru tons of servers to find the one you want.


In this scenario, I use the Connect to Server command. To do this, get the following info first:


1. The Server Name.

2. Is this a windows server or a mac server.

3. Is there a specific share or folder to which you want to connect?

After all those questions have been answered, let's connect.


1. Go to Finder and hit ⌘ + k.

2. Time to type in all that info you collected.
If it is a windows share, type in "smb://"
If it is a mac share, type in "afp://"

3. Enter in the server address, this can be the server name(i.e. myserver.com) or the ip address (i.e. 127.0.0.1).

4. If you are connecting to a specific windows share or directory, add it to the end of the address.

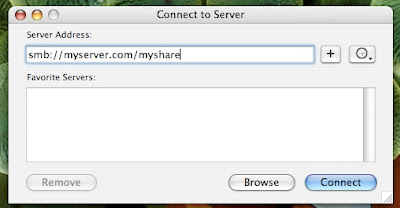
5. You should have something like "smb://myserver.com/myshare". If you want to bookmark this server, hit the "+" button. It will add it to you Favorite Server list.

6. Now hit enter. A window will pop up and ask you to enter in you user and password info. If you would like to never enter in this info again, check the "Add to Keychain" box.

7. If you did not specify the share in the address, a box will pop up to ask you which share you want to mount.

8. If you have gotten this far, the share will mount on your desktop like and other disk would.


There you have it, Connect to a Network Drive in a few steps!

enjoy.

Saturday, February 17, 2007

I COMMAND Thee!

Every once and a while I watch Jen use the computer. Why? It isn't cause I am some control freak boyfriend and I don't trust who she is emailing. Really its not! It is because I like to see how others use the computer. I enjoy noticing different methods of usage and how they compare to my own.

One thing that I have noticed is that people who typically are new to the mac tend to heavily rely on a mouse. I bet that this is because the mouse is the simplest method to interact with the computer as it does not take memorization and practice.

I think that it is interesting that people have gotten so mouse-centric as it wasn't just 15 years or so ago that all users were keyboard-centric. My question is, "Why can't we all just get along?" Seriously, why not both? They both have their strengths and weaknesses. So, for all of you mousers, here is a list of five of my most used and favorite mac key commands (Let's just assume that you are running OS 10.4 or higher).

1. The application Switcher

Application switcher sample
Exposé, a topic which covered in my most recent post is great, but you can also switch between apps in another way. Try the application switcher:


a. ⌘ + tab. Do not let go of the ⌘ key.

b. An overlay will pop up that allows you to see every running application. Continue to hit the tab key while holding down the ⌘ key to cycle thru all the application.

c. Shift + ⌘ + tab cycles thru them backwards.

d. Releasing the ⌘ key will change to the application you have selected and the overlay will disappear.

You can even select the item with the mouse as long as you are holding down the ⌘ key. You can also use this command like you would the dock. Just invoke it while dragging a document and drop the document onto the application with which you want to open it. Not sure how useful that is, but you can do it!

2. Spotlight.
Spotlight Sample

This bad boy is an amazing improvement to everyday workflow. Basically, this is Google for your personal computer. Let's try it out:


a. Hit ⌘ + SPACEBAR

b. Type in anything that you want to find

c. In the upper right hand corner, you will see a list of items that Spotlight has found. Navigate to the item by using the arrow keys or use ⌘+ arrow key to move thru the groups of items, such as documents, folders, etc.

d. Once you have found your item, hit the enter to open it.

Simple Huh? Plus you did all of this with out moving you hands away from the keyboard. If you get a large number of results, hit the "Show All" and drill even deeper. I will go into Spotlight in a later article.

3. Did you know you can define or do a thesaurus lookup on almost any word on the computer?
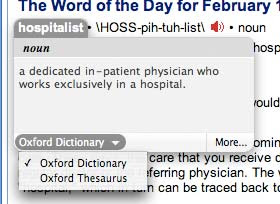

Try this:


a. Open Safari and go to any web page.

b. Select any word you would like to define and place your mouse cursor over it.

c. Hit ctrl + ⌘ + d.

This handy little trick works In Safari, Mail, TextEdit, pretty much any app that takes advantage of apple's framework. It is usually the same apps that will tell you that words are misspelled by putting the red dotted line under it. Unfortunately, not all apps on the mac do this. I am looking at you FireFox!

4. Screen grab.
I used this handy key command for all the screen shots you see here. Apple has given each one of us a tool called Grab loacted in the utilities folder within the applications folder. It works great, but to be honest why bother when it is built right in to the system.


a. Hit shift + ctrl + ⌘ + 4

b. Your mouse will turn into cross hairs. Drag the area that you want to capture.

c. Once you have let go of the mouse, it copies the selection. You can then paste it into Photoshop, Mail, Word, whatever.


Other commands with in this same vein are:


shift + ⌘ + 3 : take a screenshot of your whole screen and saves to your desktop.

shift + ctrl + ⌘ + 3 : take a screenshot of your whole screen and copies it so you can then paste it.

shift + ⌘ + 4 : turns mouse cursor into cross hairs to take a screenshot of a selected area and saves to your desktop.

All screenshots that are saved to your desktop will be saved as a PNG and be titled Picture 1, 2, 3...

5. A few commands to navigate thru the Finder (your desktop) a bit faster:


⌘ + n : new finder (file explorer) window ( You can set the default location of all new finder windows in the Finder preference setting)

shift + ⌘ + a : new finder window that takes you directly to the applications folder.

shift + ⌘ + u : new finder window that takes you directly to the utilities folder.

shift + ⌘ + n : new folder in current location in Finder.

⌘ + e : Select any external disk (cd, dvd, hard drive), hit the command, and disk will eject or unmount.

You can navigate the entire finder using your arrow keys. In Icon view, up, down, left, right can move thru the grid of icons. In list view and column view up & down move up and down the list, but left and right drill in and out of folders. For all views, ⌘ + down arrow drills into the folders and ⌘ + up arrow drills out of folders and ⌘ + down arrow on a selected file will open that file.

There are tons more commands than this and I could go on and on. My main point with this article is that you can control the Mac without ever touching the mouse, you just have to try some of these commands out, find what is useful to you and then remember to use them the next time you reach for your mouse. If used habitually, I think you will find that these commands can save tons of time.
Monday, February 05, 2007

Hey F9, Whatcha got?

One of my favorite tricks is Exposé.


Great, so what is it and why does it matter to me?

OK, you have tons of windows open. A few Safari windows, maybe a Firefox window or two. So many Finder windows that you begin to wonder if someone is playing some evil prank on you. Basically your screen is filled with junk and it is completely inhibiting you getting your work done. I am sure you have been here cause I have been in this position a thousand times.

This is where Exposé comes in to save the day.

Try this (just make sure you have tons of windows open like i described):


1. Ready, set, HIT F9!
(if you are on a laptop and your "F" keys are mapped to something like volume, hold the "Fn" key down along with all the keys I mention here on out)

2. Sit and watch in amazement.

So what just happened? Every window open on you computer just shrunk down so you can see it all. Now why? Proceed on to step two:

3. Rollover a few windows. Notice how they highlight and a description text bubble is displayed.

4. Select a window and watch it zoom into your foremost selected document/window.


Exposé is a document or window selector. It really doesn't get any more complicated than that. Even though this is as simple as pie, there is still more that Exposé can do.


1. With a few windows open in Finder
(To open more windows, hit ⌘+N)

2. Ready, set, hit F10!

This looked exactly like hitting F9, whats the difference?

This time Exposé only minimizes windows of the current application. Which is super useful for applications like Word and Photoshop where having many open windows is the norm.

The last Exposé trick is the F11 key. Lets test it:


1. Again with some windows open.

2. Just hit F11, cause I am sure you already have!


This one is pretty clear. F11 is the key you wanted when you were growing up and you mom wanted you to clean your room. It takes everything and makes it disappear so you have a nice clean computer. But not to worry, it isn't gone forever.


3. Tap the F11 key to bring the mess back!

There you go. There is Exposé in a nutshell. One of the most useful advances to the desktop in years. There is much more you can do with this, but that is for a later topic. Just remember the following:


F9 = Exposé all windows

F10 = Exposé your current application's windows

F11 = Exposé your desktop


enjoy.

Welcome to the switcherguide.

Hello.

So what is this? In the last few months (or is it years?) I have been helping my family, my girlfriend, my friends, and coworkers fix, shop for, and learn about Mac's. Apple is doing well these days, if you didn't know this, it is time to move out under that rock. With all of this movement, there is a new breed roaming this tech landscape, the switchers. That is where I come in. I've been using Mac's for years. I'm not saying that to impress in a "Oh, look at me, I am on the bleeding edge" sorta way, I am just stating the truth.

I use them at work and play and for some odd reason my brain is perfectly designed to remember the oddest key combinations imaginable. Go figure, but my oddities are your gain. So take advantage.

This blog exists for you. It will contain all the junk that has stayed in my head after helping and continuing to help everyone who needs Mac help.

That stated, email, IM, call, comment away and as always, I will try to help.